



Most trade show flooring failures are not product failures. They are handover failures. A frame arrives, a cable run is buried, a ramp is promised, and suddenly no one owns the transition. On a live build-up, that gap costs time, money and credibility.
This guide maps the installation timeline for a raised exhibition floor and assigns every step to the right party: builder, supplier or venue. You will learn what to lock down before any trade show flooring is ordered, the build-up timeline at a glance, and the critical T minus windows for spec sign-off, venue approval, delivery, site access and logistics. We then walk through build day 1 to 4, covering subfloor surveys, frame and level set, cable routing, cover laying, edge finishing, ramps and accessibility, organiser inspection and sign-off, handover to stand dressing, and de-rig removal, reuse and storage liability. Finally, you will see why most booth-floor problems are handover problems and get a one-page checklist to keep every owner accountable. Own the handovers, and the floor looks after itself.
What to lock down before any trade show flooring is ordered
Raised exhibition floors run 30 to 150 mm; height triggers ramps, visible edges, wheelchair access and organizer scrutiny. Confirm against the stand design before ordering; Why Stand Builders Choose Exhibition Flooring covers spec.
Name four roles in writing: stand builder, flooring supplier, venue or organizer technical team, and the agency or exhibitor client. Each step has exactly one owner.
Read the venue’s own floor rules, not national regulation alone; approval windows and paperwork differ by venue.
Work backwards from build day: a two-week lead time puts spec sign-off three to four weeks out, covering approval and delivery booking.
Settle rent versus buy before ordering: rental is the exhibitor default, purchase transfers storage, upkeep and removal liability to the buyer.
The trade show flooring build-up timeline at a glance
| Step | Owner | Input | Risk | Checkpoint | | Spec sign-off | Builder | Spec | Delay | Sign-off | | Height approval | Organiser | Drawings | Blocked | Approval | | Delivery window | Builder | Dock | Idle crew | Confirmation | | Subfloor survey | Builder | Levels | Bad datum | Note | | Frame and level | Agreed | Datum | Movement | Photos | | Cable routing | Electrician | Hatch plan | Exposed cables | Sign-off | | Covers, edges | Builder | Cover ref | Loose profiles | Photos | | Ramps and access | Both | Gradients | Fail | Pre-check | | Inspection | Organiser | Timeline | Delay | Sign-off | | Dressing handover | Builder | Limits | Dispute | Signatures | | De-rig | Supplier/exhibitor | Rent or buy | Misbilling | Photos |
One shared document: keep risk blunt. Build-day counts are yours. Issue it to the venue with drawings.
T minus 6 to 4 weeks: spec sign-off and pre-order
First on the timeline: spec sign-off belongs to the stand builder or agency producer; the supplier provides the technical spec sheet. Here, flooring for trade show booths becomes a fixed specification, not a budget line. Inputs: stand plan dimensions, finished height, cover finish and color reference, expected point loads, cable and power requirements, exact ramp positions. Miss it and later changes compress the two-week manufacturing and placement window into an emergency. Sign-off lists cover sample reference, panel quantity, plinth quantity, ramp count, and a named delivery contact. Allow time for client cover-finish approval before locking the order. Start Building Better Exhibition Stand Flooring Today.
T minus 3 weeks: venue approval for raised floor height
Next comes the clearest venue-owned gate in build-up.
Owner: the exhibition organizer or venue technical team. The builder submits; the organizer approves.
Anything beyond a low-profile build needs drawings, not assumptions. Submit one package: finished height, ramp positions and gradients, wheelchair access route, visible edge treatment, and evidence of structural stability under expected loads. What Is an Exhibition Floor System? covers the components inspectors examine.
Risk if missed: no approval, no installation. Approval withheld on build day means installation cannot proceed.
Checkpoint: keep the approval email or signed form on the stand. Inspection teams ask for it; folder hunting on the show floor costs an hour.
T minus 2 weeks: delivery window, logistics and site access
Owner split: supplier schedules delivery; builder owns site access. Both sign the delivery window confirmation. Confirm dock times, forklift or lift capacity, pallet count, and on-stand storage before the frame crew needs the floor. Dense pallets block aisles fast.
The two-week lead time established at spec sign-off is the anchor; emergency sourcing is not a plan. Check Stand-On Cubes delivery times for exact windows.
Risk if missed: flooring lands after the frame crew is booked, so crew hours are spent waiting, or it lands early and blocks the dressing route. Checkpoint: written confirmation with time, gate number, contact name, and a fallback window agreed with the venue.
Build day 1: subfloor survey and level check
Once delivery is locked, the builder takes the hall floor. Owner: the stand builder, even when the supplier installs. You control the site before the floor arrives.
Walk the footprint and log level variation, expansion joints, drains, service pits, existing outlets, bare concrete or carpeted hall. Each changes the plinth setting strategy. Photograph deviations with a marked-up plan; uneven panels are a named trip hazard, fixed here, not at inspection.
Miss it and the frame levels against a bad datum, carrying the error into ramp gradients and edge heights. Hand the supplier’s crew a signed survey note before the first plinth is set.
Build day 1 to 2: frame build and level set
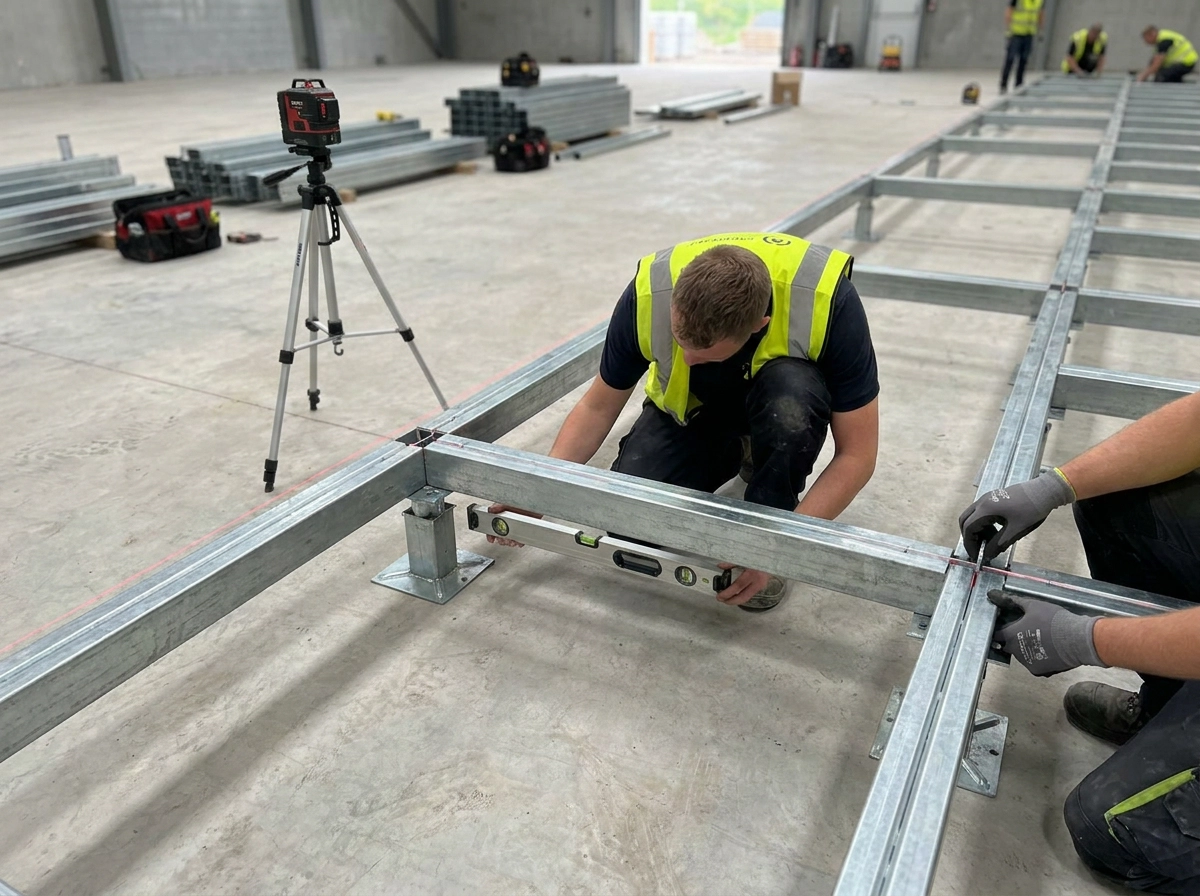
With the survey signed off, the frame goes down. Agree in writing whether the supplier’s install team or a trained builder crew owns it; ambiguity is the most expensive misunderstanding.
Confirm the specified height range matches the stand design before panels lock down. Stand-On Floor’s modular systems adjust across the 30–150 mm range; verify the quoted setting aligns with the approved drawings before locking panels down.
Sequence: set plinths to the survey datum, laser-level across the footprint, lock sections together, and check no panel moves under foot before the next bay. Poor connections cause movement and deflection; document the level check so responsibility is clear.
Before any cover is laid, run a photographed level check across perimeter and centreline.
Build day 2: cable routing and power under the floor
With the frame locked and leveled, route power and data before any cover goes down. This integration is a core reason raised floors are specified. Two owners share one checklist: the builder’s electrical contractor routes cables; the flooring supplier confirms void clearance and hatch positions. Document every service hatch and outlet on a plan the dressing crew and electrician both hold; undocumented hatches get cut open at de-rig. Exposed cables are a named trip hazard and common inspection failure, and retrofitting a route under a laid cover means lifting panels beneath a dressed stand. Checkpoint: electrician sign-off on routing and hatch positions before cover laying begins.
Build day 2 to 3: cover laying and edge finishing
With cable routes signed off, cover laying begins. The owner is the builder or supplier per contract, but both must agree the finish standard before the first panel is covered. Covers styled to a specific finish are a specification decision, not a site improvisation. Let covers acclimatize in the hall, then lay in a fixed sequence so seams run consistently and no section stretches to reach a wall. Treat edges carefully; unsealed or protruding edges create trip risk. Protect the finished surface immediately if other trades need access. A damaged surface found at inspection delays sign-off and cannot be patched in the venue inspection window. Checkpoint: photograph the completed floor from four corners before stand dressing begins.
Build day 3: ramps, accessibility and edge safety
With the finished surface documented, day 3 shifts to access. Owner split: the stand builder specifies ramp positions and gradients, the flooring supplier provides compliant ramps and plinths, and the venue confirms the arrangement meets local accessibility requirements.
Accessibility is central to modern exhibition design: smooth entry, wheelchair ramps where required, a stable walking surface, and safe edge finishes. Check gradient, width, top landing space, edge visibility for partially sighted visitors, and ramp-to-floor stability under load.
If missed, an inspector flags the ramp during a client preview, forcing visible remedial work at the worst moment.
Checkpoint: complete the ramp and accessibility check before the organiser inspection, not during it.
Build day 3 to 4: organiser inspection and sign-off
The exhibition organiser owns this step. The stand builder attends; the flooring supplier stays reachable by phone for technical questions during the window.
Walk the floor with the inspector using the timeline document as the agenda: edge profiles, ramps, cables, panel joins, floor height against the approved drawing, and fire lane clearances. Fix a panel reseat or edge trim on the spot. Escalate anything needing a new panel or ramp change to the supplier immediately rather than improvising.
If sign-off is withheld, the stand cannot be dressed and the exhibitor absorbs the delay on opening day. File the written sign-off or inspector reference number with the height-step approval email. The dressing crew then takes over.
Handover to stand dressing: who signs for the floor
The stand builder hands the surface to the agency producer or exhibitor, who owns it through dressing.
The sign-off sheet covers floor condition, cover reference, ramp positions, hatch and outlet locations, weight limits per square meter, and who to call if a panel shifts.
Brief the dressing crew in a minute: no point loads on unspread weight, no trolleys dragged across seams, no ladders on unsupported panel edges.
Skip it and de-rig damage becomes a cost dispute with no baseline evidence, billed to a supplier who caused nothing.
Checkpoint: two signatures and a timestamped photo set. Removal then runs in reverse.
De-rig: removal, reuse and storage liability
After handover, de-rig ownership follows the rent versus buy decision: the stand builder removes and packs, the flooring supplier collects a rented system, the exhibitor stores a purchased one. Confirm this at order, not after the show.
Reverse the install sequence: dressing off, cover rolled, cables disconnected, panels unlocked, plinths stacked, ramps packed, protecting panels and covers.
Reusable systems require panels to return clean, dry and correctly stacked. Damp or poorly stored covers arrive back in degraded condition and create ambiguity about responsibility, and de-rig damage gets billed to the wrong party.
Checkpoint: compare against handover photographs on site, identifying chargeable damage before the floor leaves, not in a warehouse two weeks later.
Why most trade show booth flooring problems are handover problems
The same pattern repeats during build-up. Every trip hazard on a trade show booth floor traces back to two teams assuming the other owned it: the edge profile nobody trimmed, the cable nobody rerouted, the panel join nobody rechecked once the electrician left.
The gaps repeat: height approval submitted late, cover laid before cables were routed, ramps treated as a last-minute accessory, no photographic record at handover.
As the opening section establishes, shared ownership without a named owner is no ownership at all. Blaming the product costs twice: the repair, then the relationship.
The cheapest insurance is a timeline with a name beside every step, posted on the stand wall.
The one-page handover checklist for trade show booth flooring
Print this trade show booth flooring checklist. It turns each handover into a signature.
Pre-build: Floor height confirmed and drawn; organiser height approval received; spec sign-off signed; delivery window confirmed with gate and contact; rent or buy documented.
Build: Subfloor survey recorded; plinths set to datum; level check photographed; cable routes and hatches documented; cover condition photographed before dressing; ramps installed and checked.
Inspection: Organiser sign-off obtained; approval email on site; edge profiles and panel joins walked and confirmed.
Handover: Two-signature sheet completed; dressing crew briefed on weight limits and hatch locations; supplier contact shared with producer.
De-rig: Removal sequenced in reverse; covers rolled and stored dry; condition compared against handover photographs; damage identified before the floor leaves site.
Own the handovers and the floor looks after itself
Build the timeline before the show, not during it. Spec-stage planning at sign-off prevents firefighting on build day.
Assign one owner per step in writing, shared with venue and supplier. Approval, accessibility, and inspection stay venue-owned; builders cannot absorb them on build day.
Book the two-week lead time with buffer and confirm delivery access early; late or early arrivals both cost crew hours.
Specify a raised system with finished covers matched to your styling, compliant ramps, and plinths. Stand-On Floor builds modular systems for stand builders, agencies, and experience builders, advising on height, accessibility, and covers at spec stage.
As the checklist above shows, photographs are your cheapest evidence.
Conclusion
Use the one-page checklist on your next project. Share it with your builder, venue, and supplier at spec stage. Stand-On Floor can help you specify a compliant modular raised system that matches your booth design.
Own the handovers, and the floor looks after itself.